
Breakfast & Brunch
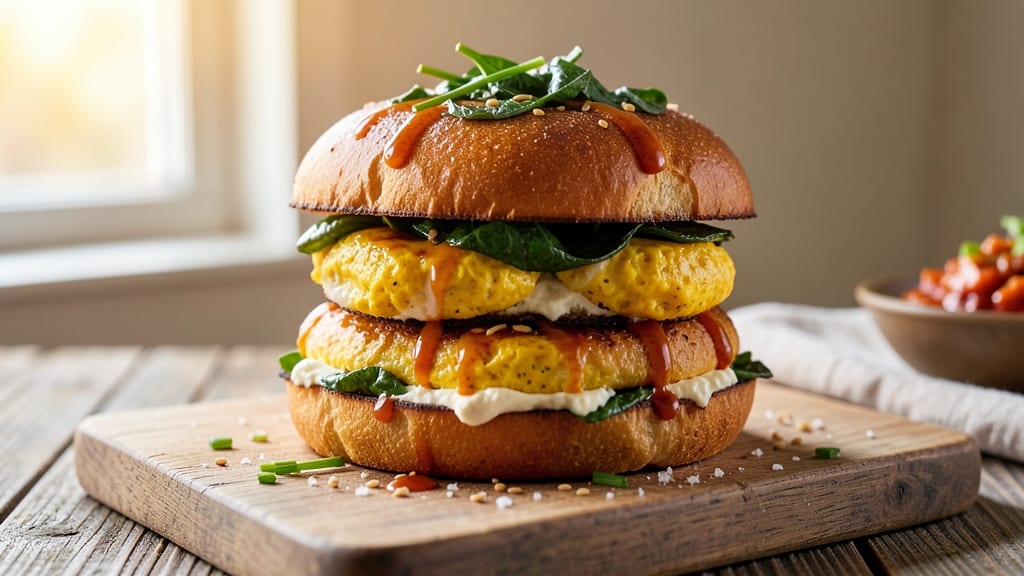
This vegan egg sandwich recipe transforms chickpea flour into a crispy, fluffy scramble that mimics scrambled eggs perfectly. The secret lies in a simple blend of chickpea flour, turmeric for color, and nutritional yeast for that signature eggy flavor—no tofu or expensive substitutes required.
What makes this recipe stand out is how it delivers the texture and satisfaction of a classic egg sandwich without any animal products.
The process is straightforward: whisk together the chickpea mixture with water and spices, then cook it in a nonstick pan until golden and crispy. The result is a scramble that holds its shape beautifully between slices of toasted bread, with avocado creaminess adding a rich, velvety contrast.
This sandwich is hearty enough to be a full breakfast but quick enough for a weeknight meal.
Every bite delivers crispy edges, fluffy centers, and a savory depth that rivals traditional scrambled eggs. The avocado creaminess ties everything together, making it impossible to tell this isn't a classic egg sandwich.
Whether you're vegan, looking for a protein-packed breakfast, or just craving something different, this recipe delivers on flavor and texture without compromise.
Pair it with hot sauce or fresh herbs for extra brightness, or keep it simple with a sprinkle of salt and pepper. The best part? This sandwich comes together in under 15 minutes, making it the perfect way to start your day or fuel up for the morning ahead.
Ingredients for vegan egg sandwich
Simple pantry staples transform into a hearty vegan breakfast that rivals classic egg sandwiches.
| Ingredient | Amount | Notes |
|---|---|---|
| Chickpea Flour 🌾 | ¾ cup | Ensure it's fine and smooth |
| Water 💧 | ¾ cup | Room temperature preferred |
| Turmeric Powder 🌿 | ½ tsp | For authentic egg color |
| Nutritional Yeast 🧀 | 2 tbsp | For cheesy, eggy flavor |
| Garlic Powder 🧄 | ½ tsp | Freshly ground preferred |
| Onion Powder 🧅 | ½ tsp | For savory depth |
| Salt 🧂 | ½ tsp | Kosher or sea salt |
| Black Pepper 🌶️ | ¼ tsp | Freshly ground preferred |
| Ripe Avocados 🥑 | 1 whole | For creamy texture |
| Lemon Juice 🍋 | 1 tbsp | Freshly squeezed |
| Unsalted Vegetable Oil 🫒 | 1 tbsp | For cooking scramble |
| Whole Grain Bread 🍞 | 8 slices | Toasted to preference |
| Hot Sauce 🌶️ | 1 tsp | Optional for serving |
| Fresh Chives 🌿 | 2 tbsp | Chopped for garnish |
Chickpea flour is the star here—Bob's Red Mill or Anthony's Goods are reliable brands. The flour should be fine and smooth, not gritty. Turmeric is key for that eggy color, but don't overdo it—just half a teaspoon gives perfect golden hue without overpowering. Nutritional yeast adds the signature umami flavor; Bragg6-12 months in a cool, dark place, while fresh avocados last 3-5 days once ripe.
No nutritional yeast? White miso paste at half the amount works in a pinch for umami depth. Substitute onion powder with 1/4 tsp dried onion flakes, but fresh minced onion (1/2 tsp) would be even better. For the avocado creaminess, if you're short on time, store-bought vegan cream cheese can replace it, though fresh avocado gives that luxurious texture. The scramble can be made ahead and reheated—just add a splash of water to keep it moist. For extra protein, toss in 1/4 cup cooked quinoa or 2 tbsp hemp seeds when assembling the sandwich.
Prep the avocado mixture last—it browns quickly. Store any extra avocado spread in an airtight container with plastic wrap pressed directly on the surface to prevent browning. The cooked scramble reheats beautifully in a dry pan over medium heat for 2-3 minutes. Keep the bread in a paper bag to maintain freshness for 3-4 days. This sandwich freezes surprisingly well—assemble it, wrap tightly, and freeze for up to 1 month. Reheat in a toaster or air fryer for crispy perfection.
Why You'll Love This Recipe
- Pantry Magic: I swear by this recipe when I forget to buy eggs—just whisk chickpea flour, water, and a pinch of turmeric until it’s smooth. No cracking, no shelling, just a few minutes of stirring.
- Umami Bomb: That nutritional yeast? It’s the secret weapon—adds this deep, cheesy richness that makes the sandwich taste like a breakfast classic. Honestly, my non-vegan friends don’t even ask what’s in it.
- Lunchbox Hero: Between us, this is my go-to for packed lunches or quick office meals. The eggs hold up perfectly for a day (or two), and the crispy edges stay intact—no soggy sandwiches here.
- Budget Breakfast: A single bag of chickpea flour lasts me forever, and the other ingredients cost pennies. For under $5, I feed my family breakfast sandwiches that actually feel special—not just scrambled eggs.
Step-by-step instructions for crispy chickpea scramble sandwiches
Here's how to create a satisfying vegan egg substitute that delivers crispy texture and rich flavor.
Whisk the Chickpea Scramble Batter
In a medium bowl, combine the 0.75 cup chickpea flour, 0.75 cup water, 0.5 tsp turmeric powder, 2 tbsp nutritional yeast, 0.5 tsp garlic powder, 0.5 tsp onion powder, 0.5 tsp salt, and 0.25 tsp black pepper. Use a whisk to eliminate any lumps—you want a smooth, pancake-like consistency. The turmeric gives that classic egg color, while the nutritional yeast adds that savory, cheesy depth you'd expect from scrambled eggs.
Let the batter rest for 5 minutes while you prepare your pan. This resting time helps the flour fully hydrate, which prevents a gummy texture when cooking. If the batter looks too thick after resting, add 1-2 teaspoons of water to loosen it slightly. The mixture should coat the back of a spoon but still be pourable.
Cook the Scramble in a Hot Skillet
Heat 1 tbsp unsalted vegetable oil in a non-stick skillet over medium heat until shimmering. Add the chickpea batter and spread it evenly with a silicone spatula, creating a thin, even layer. Let it cook undisturbed for 2-3 minutes until the edges begin to set and pull away slightly from the pan.
I like to press down gently on the scramble during the first minute—this prevents it from curling and ensures even contact with the pan. You'll know it's ready to flip when the top looks dry and the edges are lightly golden. Flip the scramble and cook for another 2-3 minutes until both sides are crispy and golden brown. Remove from heat and keep warm while you prepare the avocado cream.
Prepare the Avocado Cream
While the scramble cooks, mash the 1 whole ripe avocado in a bowl with a fork until completely smooth. Add the 1 tbsp lemon juice and mix well to prevent browning. The lemon juice also brightens the flavor and balances the richness of the avocado. For extra creaminess, you can add 1-2 teaspoons of water if needed, but the avocado should be smooth enough on its own.
This step is where the sandwich gets its luxurious texture. The avocado cream acts as a perfect vehicle for the crispy scramble, mimicking that creamy egg yolk you'd find in a classic egg sandwich. Taste and adjust seasoning with a pinch of salt if needed—avocados can vary in saltiness.
Assemble the Sandwiches
Toast 8 slices whole grain bread to your preferred level of crispiness. I like mine golden brown and slightly crispy for contrast against the soft scramble. Spread 2 tbsp of the avocado cream on each slice of bread, dividing it evenly between all 8 slices. Then, place 2-3 spoonfuls of the crispy chickpea scramble on half of the slices, spreading it out to cover the avocado layer completely.
Top with the remaining bread slices to complete the sandwiches. Press down gently to help them hold together. The combination of crispy scramble, creamy avocado, and toasted bread creates that perfect texture contrast in every bite. For an extra kick, drizzle with 1 tsp hot sauce before serving.
Garnish and Serve Immediately
Sprinkle each sandwich with 2 tbsp chopped fresh chives, dividing them evenly. The chives add a fresh, bright note that cuts through the richness of the avocado and scramble. Serve immediately while the scramble is still crispy and the avocado remains creamy. These sandwiches are best enjoyed fresh—they hold together well for about 15 minutes but start to soften after that.
For maximum crispiness, I recommend assembling the sandwiches right before serving. The contrast between the crispy scramble, creamy avocado, and toasted bread makes this vegan egg sandwich a satisfying alternative that even non-vegans will love. Enjoy with a side of fresh fruit or a simple green salad for a complete meal.
Pro Tips For Making Vegan Egg Sandwich
- STIR VIGOROUSLY AT FIRST: The second you mix chickpea flour and water, get that spoon moving—no half-hearted stirring. I learned this after my first batch turned into a lumpy, rubbery mess. A quick 30-second whip before adding spices keeps the batter smooth and prevents clumps that ruin the texture.
- WHISK IN HOT WATER: Use warm (not boiling) water for the batter—about 160°F (70°C). Cold water makes the chickpea flour fight you, while hot water can scramble the proteins too fast. I now microwave mine for 20 seconds first, then whisk. The batter cooks more evenly, and your "eggs" hold together better.
- SALT THE PAN BEFORE COOKING: Resist the urge to skip this—generously salt your nonstick pan before adding the batter. The salt creates a crust that prevents sticking, and it seasons the outside like a real fried egg. I used to wonder why my vegan eggs tasted bland until I realized I’d forgotten this step.
- LET THE BATTER REST: Give the batter 5 minutes to sit after mixing—no, you don’t have to wait forever. This lets the chickpea flour absorb the water fully, so your "eggs" don’t fall apart when flipping. I was skeptical until I tried it; now I never rush this part.
Common mistakes when making your vegan egg sandwich
Overcooking the Scramble
Watch the heat closely—chickpea flour scramble burns faster than eggs. Once it reaches golden brown on the bottom, flip immediately. I’ve ruined batches by letting them sit too long on medium-high heat, resulting in a bitter, dry mess.
Keep heat at medium and use a nonstick pan (I prefer Cuisinart MultiClad) to prevent sticking. 🔥
Skipping the Rest
Letting the batter rest for 5 minutes is non-negotiable. I’ve made this mistake and ended up with a gummy, uneven scramble. The flour needs time to fully hydrate—this prevents lumps and ensures a smooth, crispy texture.
If you’re in a rush, whisk vigorously for an extra 30 seconds to help break down any stubborn clumps.
Using Cold Ingredients
Cold water or flour straight from the fridge can make the batter clump and cook unevenly. Always use room-temperature water and let the flour sit out for 10 minutes if it’s chilled.
I keep my chickpea flour in the pantry and measure water from the tap after running it for 30 seconds to warm it slightly. Cold ingredients also slow down the cooking process, leading to uneven doneness.
Wrong Pan Choice
A cast-iron skillet might seem like a good idea, but it’s too heavy and retains too much heat for delicate chickpea scramble. Stick to a nonstick skillet (like GreenPan) or a well-seasoned carbon steel pan.
If you don’t have nonstick, lightly oil the pan and use a silicone spatula to prevent sticking. A thin, even layer is key—overcrowding steams instead of crisps.
Avocado Over-Mashing
Mashing avocados too aggressively introduces air, which makes the cream separate and turn grainy. Use a fork for a smooth but slightly textured consistency—this mimics the natural creaminess of egg yolks. If the avocado looks too thick, add 1 tsp lemon juice or water (not milk, which can curdle).
I also press the avocado against the bowl’s sides to break up any stubborn chunks without overworking it.
Assembling Too Early
Chickpea scramble loses its crispiness faster than eggs. Assemble sandwiches only when the scramble is piping hot—waiting even 5 minutes makes it soft and soggy. Toast the bread fresh, spread the avocado immediately, and add the scramble while it’s still sizzling.
For make-ahead meals, cook the scramble, cool it completely, and store it separately. Reheat in a dry pan for 2 minutes before assembling.
Nutrition facts
Frequently asked questions
Can I make this vegan egg sandwich without chickpea flour?
For a quick alternative, use 1/2 cup store-bought vegan egg substitute (like Just Egg) mixed with 1 tbsp nutritional yeast and 1/2 tsp turmeric. Cook it in the same way as the chickpea scramble. If you prefer a flour-based option, 1/2 cup all-purpose flour or 1/4 cup cornstarch mixed with 1/4 cup water works too—just reduce the liquid slightly for a firmer texture.
How do I prevent the avocado from turning brown?
Lemon juice is your best friend! Always add 1 tbsp lemon juice to the mashed avocado and keep it covered until ready to use. For extra protection, press plastic wrap directly on the surface of the avocado spread in the bowl. If browning occurs, simply mix in another 1/2 tsp lemon juice—it brightens the flavor too.
Can I make this sandwich ahead of time?
Yes, but with a few adjustments. Cook the scramble and let it cool completely, then store it in an airtight container in the fridge for up to 3 days. Toast the bread fresh and reheat the scramble in a dry pan over medium heat for 2-3 minutes until crispy again. The avocado should be mashed and stored separately—add it fresh when assembling to maintain creaminess. For freezing, assemble sandwiches, wrap tightly, and freeze for up to 1 month. Reheat in a toaster or air fryer for best results.
What's the best bread for this sandwich?
Whole grain bread works perfectly, but you can also use sourdough, rye, or even brioche for extra richness. For a lighter option, try white sandwich bread or ciabatta. Avoid overly soft breads—they'll get soggy from the avocado. Toasting is key to achieving that satisfying crunch in every bite.
Why does my scramble taste bland?
It's likely missing the umami boost! Double-check your nutritional yeast—it's what gives that eggy, cheesy flavor. If you're short on time, try adding 1/2 tsp soy sauce or 1/4 tsp white miso paste to the batter. Also ensure your spices are fresh—old garlic or onion powder can lose their punch. A pinch of smoked paprika adds depth too. Taste as you go and adjust seasoning with salt and pepper.