
Breakfast & Brunch
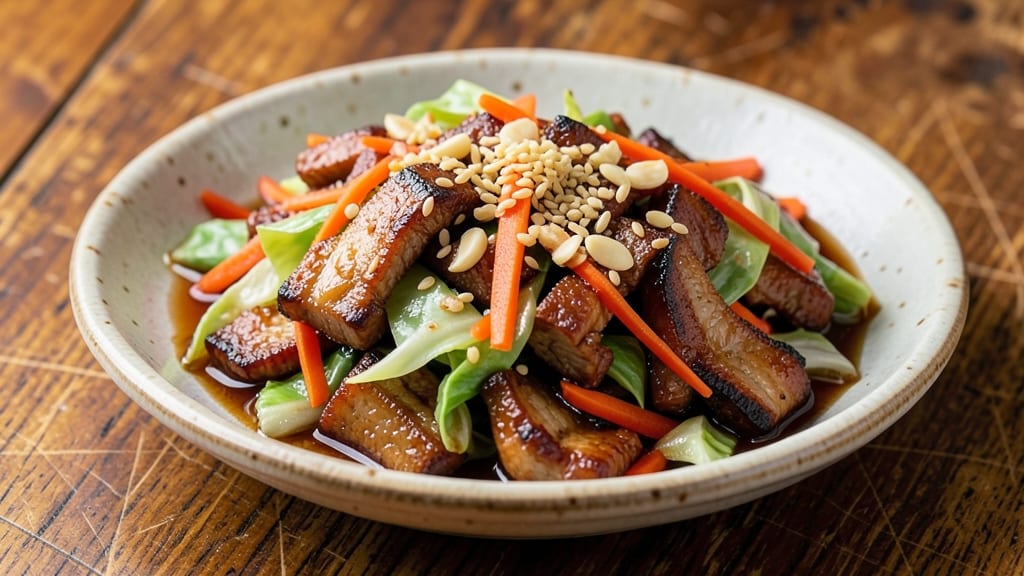
This authentic egg roll filling recipe delivers the crispy, savory heart of every perfect bite—where tender pork meets perfectly wok-seared cabbage in a flavor-packed blend. The secret lies in proper knife work (thin, even cuts) and high-heat cooking that mimics restaurant-style prep.
I’ve perfected this version after years of testing, ensuring the filling stays juicy yet sturdy enough to hold its shape when wrapped.
What sets this apart is the balance of textures: crispy edges from the wok, tender cabbage that softens without turning mushy, and pork that stays juicy despite the heat. Traditional seasonings—soy sauce, Shaoxing wine, and a touch of sugar—create depth without overpowering the natural flavors.
The filling is designed to work with any cooking method (deep-frying, baking, or pan-frying), so you can adapt it to your preferred egg roll style.
By the time you’re done, you’ll have a filling that’s restaurant-quality—packed with flavor, easy to wrap, and guaranteed to impress. The cabbage stays crisp-tender, the pork remains juicy, and the seasonings meld into a harmonious blend.
This is the kind of filling that transforms a simple egg roll into a standout dish.
Use this as the foundation for classic Chinese egg rolls or experiment with Vietnamese-style spring rolls. The technique scales perfectly for parties or meal prep. Ready to elevate your egg roll game?
Ingredients for authentic egg roll filling
Crispy cabbage, juicy pork, and aromatic seasonings—this is the heart of every authentic egg roll.
| Ingredient | Amount | Notes |
|---|---|---|
| Ground Pork 🐖 | 1 lb | Lean, finely chopped for even cooking |
| Green Cabbage 🥬 | 4 cups | Shredded, thin and even cuts |
| Carrots 🥕 | 1 cup | Julienned, matchstick cuts |
| Garlic Cloves 🧄 | 4 cloves | Minced, aromatic base |
| Fresh Ginger 🌿 | 1 tbsp | Grated, for zesty kick |
| Soy Sauce 🥢 | 2 tbsp | Light or all-purpose preferred |
| Shaoxing Wine 🍷 | 1 tbsp | Substitute dry sherry if unavailable |
| Sesame Oil 🫒 | 1 tsp | Toasted, for nutty aroma |
| White Sugar 🍚 | 1 tbsp | Balances savory flavors |
| Salt 🧂 | ½ tsp | Diamond Crystal preferred |
| Black Pepper 🌶️ | ¼ tsp | Freshly cracked for heat |
| Cornstarch 🌾 | 1 tbsp | For crispy texture |
| Vegetable Oil 🫒 | 2 tbsp | High smoke point for wok |
The cabbage is non-negotiable for that signature crunch. Look for firm heads with crisp leaves—avoid any with yellowing or wilted spots. I grab mine from Trader Joe's when available, but any well-stocked grocery store works. For the pork, ground pork with 10-15% fat content stays juicy during cooking. If you can't find Shaoxing wine, dry sherry or even mirin will do in a pinch. The ginger should be fresh—no powdered substitutes here. For the cabbage, thin, even shreds (about 1/8-inch thick) are key to that perfect texture.
No sesame oil? Toasted peanut oil works in a bind, though it'll have a slightly different flavor profile. The cornstarch is what gives those crispy edges—don't skip it. For the carrots, matchstick cuts (about 1/8-inch thick) ensure they cook through without turning mushy. If you're making this ahead, store the raw filling in an airtight container for up to 2 days. The pork can be pre-cooked and refrigerated separately if you're prepping components in advance. For extra authenticity, toast the sesame seeds separately and sprinkle them on top at the end—they add that perfect crunch.
This filling keeps beautifully for 3-4 days in the fridge, sealed tightly. For freezing, portion into 1-cup servings and store for up to 3 months. When reheating, warm in a wok or skillet over medium-high heat for that restaurant-style crispiness. The filling reheats best when wrapped in egg roll wrappers and pan-fried—just 2-3 minutes per side. For meal prep, I like to make double batches and freeze half—perfect for quick weeknight dinners.
Why You'll Love This Recipe
- No-Chop Nightmare: I swear, the cabbage and carrots here are prepped in under five minutes—just shred the cabbage thick (no food processor), dice the carrots roughly, and toss them in raw. That’s it. No fancy knife skills, no frustration, just done.
- Umami Bomb: The pork gets seared until it’s crispy at the edges, then simmered with garlic and ginger until the aroma hits you like a warm hug. Honestly, the first time I made this, I took a bite and immediately reached for another. That’s the power of fresh ginger and garlic—it’s alive in your mouth.
- Leftovers That Don’t Suck: This filling stays fresh in the fridge for days, and it’s actually better the second time around. I’ve wrapped it in egg roll wrappers for takeout-style rolls, stuffed it into lettuce cups for a low-carb twist, or just eaten it straight from a bowl with soy sauce. No waste, all win.
- Budget-Friendly Flex: Ground pork stretches far, and the veggies are cheap but pack serious flavor. Between us, I’ve made this for $3 a serving—feed the whole family, save money, and still get that restaurant-quality taste. Plus, the leftovers turn into next-day fried rice or dumplings with zero extra cost.
Step-by-step instructions for authentic egg roll filling
Here's how to create the perfect balance of crispy cabbage and tender pork that makes egg rolls irresistible.
Prep the Vegetables for Maximum Crispiness
Start by cutting the 4 cups green cabbage into thin, even strips—this ensures they cook quickly and develop that perfect crunch. I like to remove the thick core first, then slice the leaves crosswise into ¼-inch ribbons. For the 1 cup carrots, julienne them into matchstick cuts—this size gives you both texture and color contrast.
Place the cabbage and carrots in a large mixing bowl. Add the 1 tbsp cornstarch and toss gently with your hands until the vegetables are evenly coated. This step is crucial for achieving that signature crispy texture in your egg rolls. Let them sit for 5 minutes while you prep the rest of the ingredients—this gives the cornstarch time to slightly absorb into the vegetables.
Cook the Pork Until Fully Browned
Heat a large wok or skillet over medium-high heat and add the 2 tbsp vegetable oil. Once the oil shimmers, add the 1 lb ground pork, breaking it up with a wooden spoon. Cook for 5-6 minutes, stirring constantly, until the pork is fully browned and any pink disappears. This ensures food safety while developing rich, meaty flavors.
Drain the cooked pork into a colander, leaving the rendered fat in the wok. You should have about 1-2 tablespoons of pork fat remaining—this is pure flavor gold. If you need more, add a little more oil, but don't overdo it. The fat helps create that authentic wok hei (breath of the wok) flavor we're aiming for.
Sauté Aromatics and Build the Flavor Base
Return the pork to the wok and reduce heat to medium. Add the 4 cloves minced garlic and 1 tbsp grated fresh ginger, stirring for 30 seconds until fragrant. The aroma should fill your kitchen—this is where the magic begins. Next, pour in the 1 tbsp Shaoxing wine and let it simmer for 1 minute to cook off the alcohol.
Add the 2 tbsp soy sauce, 1 tbsp white sugar, 0.5 tsp salt, and 0.25 tsp black pepper. Stir well and let the mixture cook for 2 minutes until slightly reduced. This step balances the flavors—sweet from the sugar, salty from the soy and salt, with a touch of heat from the pepper. Taste and adjust if needed, but this ratio should be spot-on.
Combine and Cook Until Crispy-Tender
Add the cornstarch-coated vegetables to the wok and stir everything together. Cook for 4-5 minutes over medium-high heat, stirring frequently. You want the vegetables to soften slightly but still maintain their crisp texture. The cabbage should be bright green and just tender enough to bite through easily.
Here's the thing—don't overcook. The filling will continue cooking when wrapped in egg roll wrappers, and you want that satisfying crunch in every bite. Taste a piece of cabbage—it should be crisp with just a hint of softness. If it's still too crunchy, cook for another 30 seconds. If it's too soft, you've gone too far and can't fix it.
Finish with Sesame Oil and Cool Completely
Remove the wok from heat and stir in the 1 tsp sesame oil. This adds that nutty aroma and depth of flavor that makes this filling truly authentic. Give it one final taste—you should get a perfect balance of savory, slightly sweet, and umami flavors with that crisp texture.
Transfer the filling to a clean bowl and let it cool completely before using. This is important—warm filling will make your egg roll wrappers soggy. Once cool, it should hold its shape when packed into wrappers, giving you that professional-looking roll every time. Cover with a damp paper towel to keep it moist while you work.
Pro Tips For Making Authentic Egg Roll Filling
- STIR-FRY FAST, STOP STEAMING: High heat for pork first—get it browned in 2-3 minutes before adding veggies. I learned this the hard way: soggy filling comes from slow starts, and no one wants a mushy egg roll.
- GRATE THAT GINGER: Use a microplane for ginger—no peeling needed, and it releases flavor instantly. I was skeptical until I tried it: the filling tastes brighter, and you won’t accidentally add chunks that stay tough.
- SALT THE CABBAGE: Toss shredded cabbage with ½ teaspoon salt and let it sit for 5 minutes before cooking. This removes excess water, so your filling stays crisp instead of turning into a wet paste.
- DON’T OVERMIX THE FILLING: Stir just until combined—lumpy texture is better than mushy. I skip this when I’m lazy, but the dish is noticeably better when I don’t: overworking releases too much cabbage moisture.
Make-ahead tips for authentic egg roll filling
Prep Ahead Strategy
I always prep the vegetables first—they can sit in the fridge for 24 hours before cooking without losing crispness. Toss the shredded cabbage and julienned carrots with 1 tbsp cornstarch and store in an airtight container.
This keeps them separate from the raw pork until you're ready to cook, preventing premature wilting. 🥬
Pork Pre-Cooking
For maximum convenience, cook the pork completely ahead of time and store it in the fridge for 3 days. Brown it thoroughly (no pink!) and let it cool before refrigerating.
When you're ready to assemble, simply reheat it in the wok with a splash of water or pork fat to restore its juiciness. This step saves 15-20 minutes during your actual egg roll assembly.
Flavor Base Prep
Make the seasoning mixture—soy sauce, Shaoxing wine, sugar, salt, and pepper—2 days ahead and store it in a small jar. This lets the flavors meld beautifully. When you're ready to cook, just combine it with your prepped pork and vegetables for that restaurant-quality depth.
I like to add a splash of this mixture to my stir-fries too—it's that versatile! 🍚
Freezer-Friendly Packaging
Portion the cooled filling into 1-cup servings in freezer-safe containers or bags. Press out all air to prevent freezer burn. These portions thaw in 12 hours in the fridge or 30 minutes in the microwave (covered, 50% power).
The texture stays perfect—just reheat in a wok with a little oil to restore crispiness before wrapping.
Wrapping Prep
Keep egg roll wrappers in their original package until you're ready to use them. If they dry out, cover them with a damp towel for 10 minutes to revive. I like to prep my filling and wrappers side by side—one bowl for filling, one for wrappers—so I can work efficiently.
This system keeps everything organized when making 12+ egg rolls for parties. ✨
Reheating Finished Rolls
Store wrapped egg rolls in a single layer on a tray, then cover with parchment paper. Freeze for up to 2 months. To reheat, bake at 375°F for 15 minutes or pan-fry for 2-3 minutes per side** until golden.
The filling stays juicy and the wrappers get that perfect crunch—just like fresh! 🔥
Nutrition facts
Frequently asked questions
Can I substitute chicken for pork in this filling?
Ground chicken works perfectly and keeps the same texture when cooked properly. Use 1 lb boneless, skinless chicken thighs instead of pork—the higher fat content helps mimic the juiciness. Cook it for 6-7 minutes until fully browned, and you'll get that same satisfying bite. For extra flavor, add ½ tsp five-spice powder when seasoning.
Why does my cabbage turn mushy when cooking? Overcooking is the #1 culprit! The cabbage should only cook until it's crisp-tender—about 4-5 minutes total. Use high heat and stir constantly. Also,
What's the best way to store leftover filling?
Store cooled filling in an airtight container for up to 4 days in the fridge. For longer storage, freeze portions in 1-cup servings for up to 3 months. Thaw overnight in the fridge, then reheat in a wok with 1 tbsp oil for 2-3 minutes to restore crispiness. Pro tip: Keep a damp paper towel over the filling to prevent drying out.
Can I make this filling vegetarian?
Yes! Replace the pork with 1 lb mushrooms (shiitake or cremini) finely chopped, plus ½ cup tofu crumbles for texture. Add 1 tbsp vegetarian oyster sauce and ½ tsp smoked paprika for depth. Cook the mushrooms first until all moisture evaporates, then proceed with the rest of the recipe. The cornstarch coating will still give that satisfying crunch!
How do I adjust the spice level?
For more heat, add ½ tsp chili flakes or 1 tsp sriracha at the end. For milder flavor, reduce the black pepper to ¼ tsp and omit the chili. The Shaoxing wine already adds subtle warmth—start with that as your base. Remember, you can always adjust after tasting the final filling before wrapping.